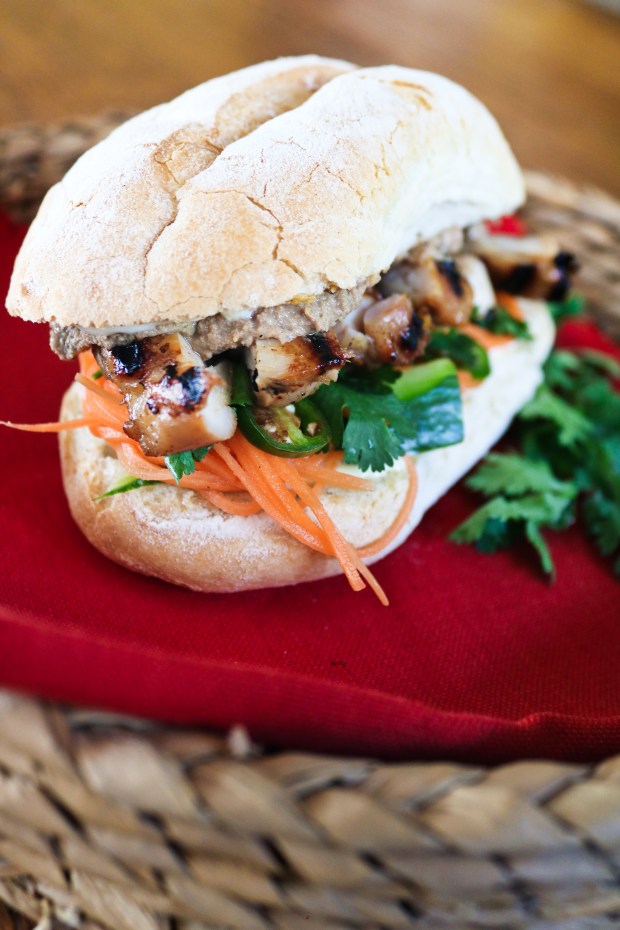
Pickles

Bánh Mì (Vietnamese Sandwich)

Ingredients:

400g boneless chicken thighs, or pork neck steaks
1 large fresh baguette, cut into 4
Mayonnaise
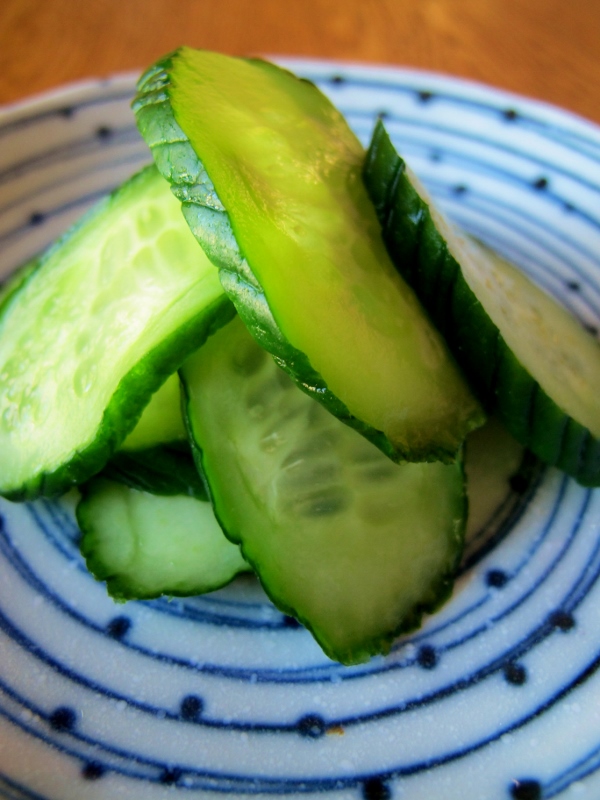
½ cucumber, cut into batons
1 large green chilli, finely sliced
Fresh Coriander (Cilantro)
Maggi Seasoning Sauce (sub: light soy sauce)

Optional Extra: Chicken or pork liver pâté
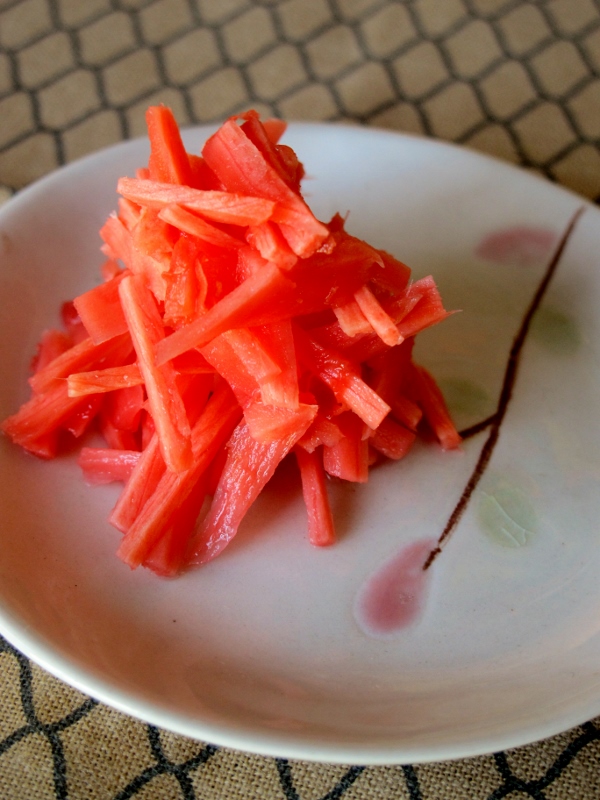
Pickled Carrots:
2 large carrots
½ cup white sugar
1 cup white rice vinegar
½ TSP salt

Marinate:
2 TBSP light soy sauce
2 TBSP fish sauce
2 TBSP brown sugar
2 stalks lemongrass (outer skins removed), finely minced
2 garlic cloves, finely minced
½ TBSP sesame seed oil
1 TBSP cooking oil
Salt and ground white pepper, a pinch of each

METHOD:

  1. Thinly shred the carrots using either a mandolin or by hand. In a pot, heat up the sugar, vinegar, and salt until the sugar dissolves. Leave to cool then pour over the carrots. Leave to pickle overnight, or for at least a couple of hours. 
  2. If using pork, slice the meat thinly across the grain. If using chicken, leave the thighs whole. In a mixing bowl, combine all the marinate ingredients. Add the meat and mix well. Leave to marinate for as long as possible – preferably overnight, or for at least a couple of hours.
  3. Heat a griddle pan till just smoking, lay the marinated meat in a single layer onto the pan. Leave to sear for 2 minutes, then flip the meat over for another couple of minutes, or until the meat cooks through and is slightly charred. Place the cooked meat in a bowl and leave to one side to rest.
  4. Spread the mayonnaise on both sides of the baguette, the sprinkle over a few drops of Maggi Seasoning Sauce/light soy sauce over the mayo. Optional: spread a generous amount of chicken liver pâté on one side of the baguette (on top of the mayonnaise).
  5. Divide the meat between the 4 sandwiches. If using chicken, cut the meat into medium bite-sized chunks.  
  6. Top with the pickled carrots, sliced chilli, coriander and cucumber.
  7. Place the top half the baguette over the sandwich and give it a light squish to help the favours meld.

Cape Malay Pickled Fish

Down here in the Cape you always know Easter is just around the corner when a seasonal preoccupation takes hold of our beloved city; yes, I’m talking about our pickled fish obsession.

Like tinsel before Christmas, it seemingly comes out of nowhere.

Overnight supermarkets load tables with tubs of this sweet & sour delight, whole yellowtail is suddenly on the Specials board of your local fishmonger and, most tellingly, internet and food blog searches for pickled fish recipes sky rocket. All pickled portents that tell us one thing – Easter is upon us.

Before its association with Easter, pickled fish was simply a tasty way for the Cape Malay community to make the most of an abundance of fish during the summer months by preserving the fish – allowing them to keep the fish for an extended period of time. This classic Cape Malay dish is the perfect example of the heavy influence of Malaysian and Indonesian culture on Cape cuisine as the pickling liquid is more akin to a sweet and sour curry than any other methods of pickling fish.  Traditionally snoek and yellowtail were the favoured catch as their dense flesh withstands the pickling process especially well, but flaker fish such as cob and hake can also be used although I prefer using yellowtail.

Of course there is also the small matter of what you should serve your pickled fish with.

The most common way is to simply have it with buttered white bread, but for those of you with a sense of adventure you can always try it with another Easter treat – hot cross buns. I know this might sound like a crazy and unappealing combination, but there really is method in this Easter mash-up madness. Call it an Easter miracle, but for some reason it really does taste amazingly good!

Pickled fish and hot cross buns; yep, welcome to the true taste of the Cape.

For more South African recipes from the Muddled Pantry, please click HERE

Click here for the recipe

Kkakdugi 깍두기 (Cubed Daikon Kimchi)

Kkakdugi 깍두기 (Cubed Daikon Kimchi)

I have an unholy passion for kimchi and I’m not ashamed to admit it! I simply can’t get enough of this spicy Korean delight and it seems I am not alone. Some of my most popular posts to date have been kimchi related, so I thought it was about time I fed our collective obsession and posted another kimchi recipe. So this time around, I’m making one of my favourite types of kimchikkakdugi or cubed daikon kimchi.

Perhaps second only in popluarity to the almighty mak kimchi, kkakdugi is a great addition to any Korean dining experience. As you would expect with any type of kimchi, this version of the Korean staple is wonderfully piquant and highly addictive; though unlike most others, daikon kimchi has a delightful crunch and crispness to it which helps temper the spiciness of the chilli powder.

Personally, I find the process of making kkakdugi marginally less involved than mak kimchi and the fermenting period is also a little bit shorter, meaning you don’t have to wait quite as along to tuck into your kimchi! On the downside, kkakdugi doesn’t seem to fair as well as other kimchis in terms of its shelf-life, however, this may have more to do with my lack of technique and experience than a shortcoming of the dish!

With regard to technique, making any sort of kimchi is a matter of trial and error. Whilst the core process for making kimchi remains similar for each variety, each version has its own quirks and it may take a few attempts before you end up with a kimchi that suits your own tastes and preferences. Making the perfect kkakdugi has, up to now, been particularly vexing for me as I often find the kimchi comes out too watery and the daikon too limp. I have now taken to draining off the excess water as the kimchi ferments and I have also stopped peeling my daikon – both these seemingly minor tweaks to the process has resulted in a far superior end result (at least in my opinion).

For more Korean recipes from The Muddled Pantry, please click here

For tips on stocking a Korean Pantry, please click here

Click here for the recipe

Japanese Pickles (Tsukemono 漬物)

Pickles are an integral part of Japanese cuisine. Eaten with virtually every meal, pickles provide balance of flavour or are used as a palate cleanser, as is the case when eating sushi. Also considered a key element to maintaining a healthy diet, it should come as not surprise that the Japanese are somewhat fanatical about their pickles!

Commonly referred to as tsukemono, there is seemingly no end to what the Japanese will pickle or preserve! Often eaten as a side dish or as a garnish, virtually no vegetable is safe from being salted and preserved, but daikons, carrots, cucumbers and Chinese (napa) cabbage are firm favourites. The Japanese’s love of pickles is not limited to their own, Korean staples such as kimchi are also readily served as part of a Japanese meal, although such spicy preserves are a departure from your typical tsukemono.

In terms of tsukemono as a condiment or garnish, beni shoga is perhaps the most commonly eaten pickle in Japan. Made by pickling ginger in red umeboshi brine, it is almost always used as a garnish on okonomiyaki, gyūdon and yakisoba. Outside of Japan though, the most likely form of tsukemono you’ll encounter is gari, which is ubiquitous with sushi and sashimi, although you are unlikely to find the lumo-pink version in Japan, where gari is normally a less alarming beige.

Whilst a bewildering array of tsukemono can be readily bought in Japanese supermarkets, many Japanese still go to the effort of making their own. Thankfully, making your own tsukemono it is actually quite straightforward, usually all you need is some salt and time. Typically the preserving process can take quite a while to complete, however, mercifully, some Japanese pickles take considerably less time to make. Known as asazuke, these pickles can be ready to eat in a matter of hours, if not less. Often less salty than tsukemono that have been fully preserved, these “shallow” pickles are actually more palatable to Western tastes.

With that in mind, here are some of my favourite, must-have, Japanese pickles (please follow the links for the recipes):

Quick Cucumber & Ginger Pickle

Quick Cucumber & Ginger Pickle

Beni Shoga

Daikon & Carrot Pickle

Napa Cabbage Kimchi

Napa Cabbage Kimchi

Wasabi-pickled Cucumbers


Whilst all of the above recipes are relatively quick and easy to make, with pickling times ranging from an hour to a few days, all would make worthy additions to any Japanese meal. Whether it be a full-on feast or a humble bowl of gyūdon, no true Japanese meal would be complete without just a small nibble of tsukemono!

For more great Japanese recipes from The Muddled Pantry, please click here

Wasabi-pickled Cucumber

This a quick and simple Japanese pickle which makes a great addition to any Japanese meal. You can either use gherkin, Israeli, Kirby or small Mediterranean cucumbers for this recipe, but not the English variety as it is too watery.

Feel free to add more wasabi if you like it hot!

For more great Japanese recipes from The Muddled Pantry, please click here

Click here for the recipe

Beni Shōga (Red Ginger Pickle) 紅生姜

Beni ShogaPopularly served with donburi (rice-bowls) such as gyūdon and katsudon, beni shōga is perhaps one of the most common pickles found in Japan.

Unlike most other Japanese pickles, beni shōga is, in fact, eaten more like a condiment than a side dish. Much like one would expect to find an obligatory bottle of ketchup on a table in the Western-style dinner, many Japanese eateries have bowls of beni shōga for their patrons to pile onto their donburi. It is so readily available throughout Japan, these slithers of red ginger are (to my mind at least) synonymous with a wide range of my favourite Japanese dishes, so much so, none of which taste the same without it. Unfortunately, beni shōga is very hard to find outside of Japan – something that I find deeply frustrating given its integral role in so many Japanese dishes.

My irritation with the lack of authentic Japanese ingredients available in the rest of the world is compounded, in part, by the continued popularity of the lumo-pink version of gari that has become a plague upon Japanese cuisine in the West. Not only is our beloved “garish-gari” a pickled aberration not found in Japan (where it’s a considerably less alarming beige), it has also served to limit our appreciation and expectations of the diversity of Japanese food. Next time you top your sushi with that Barbie-pink slice of ginger, please give a pause to consider the other amazing taste experiences that have been side-lined in the attempt to repackage and homogenise Japanese food for Western tastes. Our ever developing palettes deserve diversity and until we put down our salmon nigiri and demand better, simple delights like beni shōga will forever be beyond our common reach.

With all that said, what’s a man to do? Well if you are me, you’ve just got to make your own beni shōga, of course!

After resolving to take my pickle-destiny into my own hands, I discovered that making my own beni shōga may not seem as impossible as I first assumed. Other than the standard pickling liquid, the lay-men’s  recipe really just has two ingredients – ginger and umeboshi (pickled Japanese plums). Luckily, umeboshi also features in Chinese cuisine and is therefore relatively easy to source locally. Pickled red from the juices of the Japanese plum (ume), the ginger does take a bit of time to take on the colour from the plums, but the end result is a pretty close approximation to the real thing. It may not be perfect, but given the scarcity of beni shōga outside Japan, who would really know the difference anyway!

For more great Japanese recipes from The Muddled Pantry, please click here

Click here for the recipe

Japanese Daikon & Carrot Pickle

Daikon & Carrot PickleNo Japanese meal would be complete without a pickle (or two), and this classic asazuke (quick pickle) will make a great addition to any meal.

Incredibly tasty and ready to eat in just under an hour, daikon & carrot pickle is sure to become a regular household staple.

For more great Japanese recipes from The Muddled Pantry, please click here

Click here for the recipe

Quick Cucumber & Ginger Pickle

Quick Cucumber and Ginger Pickle

Sweet and crunchy, this pickle is quick and easy, complimenting just about any Japanese meal.

The pickle takes at least a couple of hours in the fridge to work its magic, but after that it should keep for at least a few days before losing its texture and crunch.

For more great Japanese recipes from The Muddled Pantry, please click here

Click here for the recipe

Vietnamese Daikon and Carrot Pickle (Đồ Chua)

Vietnamese Daikon and Carrot Pickle (Đồ Chua)A classic Vietnamese pickle that goes with just about everything and can be found throughout Vietnam. Đồ Chua, however, goes especially well with sweet dishes like Braised Pork in Coconut Water (Thịt Kho Tàu), as the sharp pickle helps cut through the pervasive sweetness and creates an element of balance in the meal.

Quick and simple, this pickle can be made and eaten on the same day or it will last for a couple of weeks if kept in the fridge.

Click here for the recipe

Mak Kimchi 막김치 (Napa Cabbage Kimchi)

When most people think of kimchi they usually have Mak Kinchi in mind. Made with napa (Chinese) cabbage it is perhaps the most commonly found variety of kimchi, especially outside Korea. Of all the kimchi out there (and there are many) Mak Kimchi is still my personal favourite; it is versatile, its ingredients readily available, and most importantly, it is easy to make.

I used to buy my kimchi ready made from my local Asian supermarket, but it wasn’t really spicy enough for my palette and that it often went off very quickly. I found the latter odd, given that kimchi is by its very definition preserved and therefore shouldn’t go moldy after just a couple of weeks in the fridge.

Determined to make my own, I bought various kimchi making contraptions on my last visit to Japan. I scoured the internet looking for recipes and I stocked up on an obscene amount of Korean Chilli Powder. My first few attempts were a bit disappointing but eventually, through trial and error, I started to make passable Mak Kimchi. I must confess that I no longer use any of those weird and wonderful kimchi contraptions that I hauled all the way back from Japan. All you really need is a large glass jar, a little patience and you too can make your own kimchi!

I have no doubt that my attempts would be a mockery compared to kimchi in Korea itself; but thankfully I’m not in Korea. I live in Cape Town and here my kimchi is pretty damn good!

For more Korean recipes from The Muddled Pantry, please click here.

For tips on stocking a Korean Pantry, please click here

Click here for the recipe