Sweet Treats

Palmier / Pig’s Ear Pastries

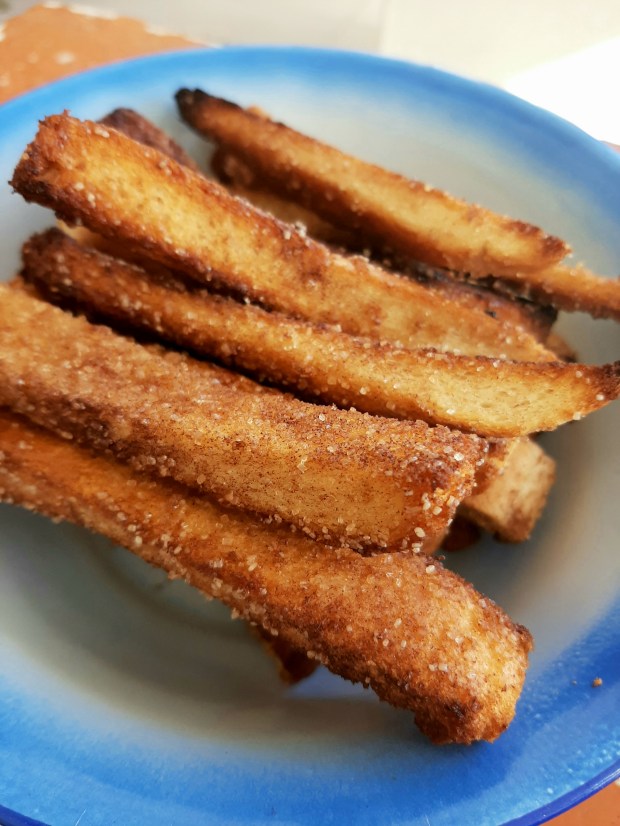
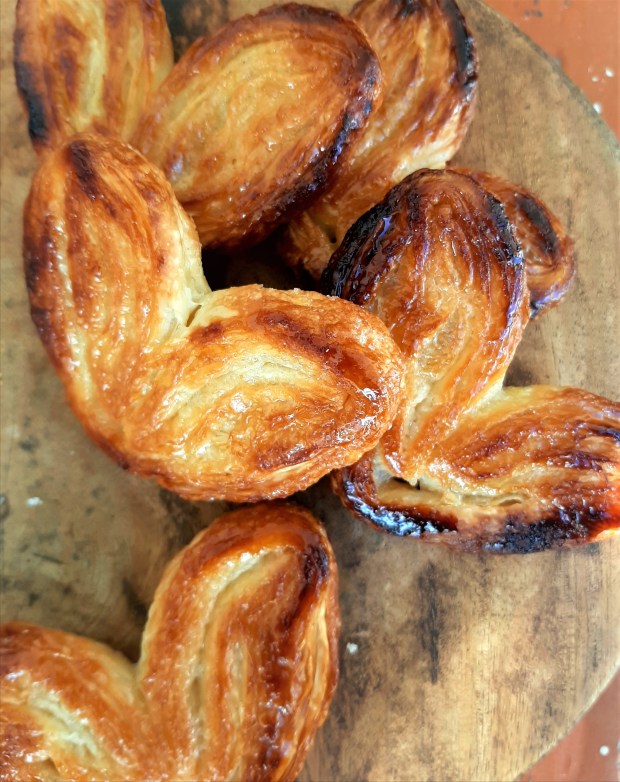
Known as palmier in their native France, but as pig’s ears to the rest of us, it is easy to understand why so many across the world have fallen for these sweet, buttery treats! After all, what’s not to love? A delight on their own or dunked in coffee, these wonderfully simple pastries are hard to resist.

Even though they may look complicated, palmier are anything but, and are actually surprisingly easy to make at home. In fact, they are quite possibly the simplest pastry I’ve ever attempted! Requiring just two basic ingredients, palmier is one of the most economical sweet treats you can make: all you’ll need is a roll of store-bought puff pastry, a cup of sugar, some folding skills, and that’s it!

As with all pastries, the temperature of the dough is essential. In this instance, it must be fully defrosted, but still chilled. If it is too warm, the butter in the pastry will melt too quickly in the oven – you won’t get a crisp finish as the butter will ooze out of the pastries and burn. It is best to defrost the puff pastry in the fridge overnight so that it is ready and waiting for teatime the next day.

Personally I don’t like to use too much sugar, instead preferring to give them a quick dab of apricot jam when they are fresh out of the oven – the sweetness of the glaze is enough for me, but this is entirely down to taste. Whilst on the topic of preferences, I like my pastries to be slightly on the “burnt” side, but if that’s not your thing then just take them out of the oven a couple of minutes early.  If you would like to expand on the traditional butter and sugar recipe, you can always add a teaspoon of ground cinnamon to the sugar.

To discover other delicious Sweet Treats from The Muddled Pantry, please click here

Click here for the recipe

Cinnamon Fingers


I had high hopes that my time under global Lockdown would somehow make a baker out of me. I was wrong.

It seems that even the abolition of free-movement as we know it wasn’t enough to force my savoury brain into understanding the mysterious life of yeast, much less her minions of flour variants. Indeed, this period of isolation has brought a great many things to an end, my self-delusion of baking grandeur among them. Sure, I can make a mean carrot cake and some killer chocolate brownies, but bread and pastries?

Alas, these are officially now beyond me.

Nonetheless, and despite being at peace with this, it is hard not to break out the KitchenAid when you live with a partner who is more sweet-tooth than human. At any rate, now more than ever, we all need an occasional pastry treat to help break the tension of the passing hours; a moment to have a cup of tea and indulge in a sweet delight. With that in mind, I couldn’t allow being a cosmically confirmed Anti-Baker get in the way of my desire to please through food, so I put away the dough hook (and those judgmental packets of instant yeast) and went back to basics.

Indeed, life under Lockdown has taught us all a great many things, and for some of us most of those lessons have been learnt in the kitchen. Caught between a grocery run and a global pandemic, we have all found ourselves short of an ingredient or two, but instead of grabbing our self-sown face masks and heading out the door, many of us have taken to making the most of what we have available at home. Thankfully, the bare necessities of a kitchen often results in the perfect recipe from almost nothing, and these cinnamon fingers are no exception.

Made with just four basic pantry ingredients, they are the prefect treat to beat the Lockdown blues. Crispy, buttery sweet, and ready in just 8 minutes, these moreish fingers make excellent use of those unwanted crusts from sandwiches and the ends of loaves. Best of all, they are virtually fool-proof and are the personification of a great treat, on the cheap.

Trust me, you’ll love this recipe so much you’ll be hoarding bread cut-offs in the fridge in no time!

To discover other delicious Sweet Treats  from The Muddled Pantry, please click here

Click here for the recipe

Cape Malay Malva Pudding

Cape Malay Malva Pudding

A veritable heart-attack on a plate, Malva Pudding is quite literally the definition of a dessert to die for!

The very first South African dessert I learnt to make upon arrival upon these shores, it may as well have been my last. Arguably the nation’s most loved traditional dessert (and certainly my partners favourite), Malva Pudding’s enduring appeal is understandable given it embodies everything my adopted country love in their desserts. Sweet, comforting and unpretentious, this classic pudding has it all! As they say here in South Africa, “who doesn’t love a good malva?”. Indeed.

On the face of it Malva Pudding is little more than your basic sponge, but is transformed when soaked in an achingly sweet cream and butter sauce. The addition of apricot jam and a magical combination of boiled milk and vinegar, turns this humble pud into the moist desserts, the such dreams are made of.

Always served warm, Malva Pudding is the prefect dessert to get you through those dark winter nights. Traditionally it is served with either cold custard (never hot), whipped cream or even vanilla ice-cream. Malva Pudding also reheats very well, a few seconds in the microwave is all it takes to revive its gooey glory!

For more South African recipes from the Muddled Pantry, please click HERE

Click here for the recipe

Eloise’s Whisky Truffles

Simple and thoroughly decadent, these wonderful French-style truffles are a chocoholic’s dream come true.

The ultimate bittersweet nibble, these truffles work well as a final flourish to a dinner party with a glass of cognac, port or even as a sneaky chocolate treat to be had when nobody’s looking.

I first had these truffles many years ago when I moved to Cape Town. My dear friend Eloise made them for me once as a thank you gift for inviting her family to dinner one evening. As it was the first time I had met her she was blissfully unaware that I’m lactose intolerant so I just passed the thoughtful gift on to my partner (who is a chocolate-fiend of note) and didn’t think about them until the next day.

As it turned out, the truffles weren’t to my partner’s taste at all as they weren’t as sweet as he would have liked. More surprisingly, however, they turned out to be right up my street! I’m not normally a ‘sweet’ person, but every now and again there are exceptions to the rule and these are most certainly that – exceptional!

Bitter, sweet and with a hint of whisky; these little chocolate gems are most definitely worth the consequences of lactose intolerance and that’s not something I say lightly.

Click here for the recipe

Peppermint Crisp Tart

Everybody knows the best way to a South African man’s heart is through a braai. However, to get him in touch with his inner soul, you need to feed him some Peppermint Crisp Tart! I don’t know what it is about this simple dessert, but seems to have a profound affect on most South Africans, inducing bouts of childhood nostalgia with every bite and even the odd misty eye (they aren’t crying of course, its just that pesky braai-smoke).

Sometimes referred to as a Fridge Tart and occasionally as a Transkei Mud Pie, Peppermint Crisp Tart was arguably the South African dessert of choice in the 80’s and early 90’s. The very definition of a store-cupboard dessert, it was originally made with Orly Whip (a long-life non-diary cream substitute) instead of cream, meaning you literally did not have to buy anything fresh to make the tart – you could whip it up in 15 minutes, pop it into the fridge to set and voilà: dessert bliss!

Today Peppermint Crisp Tart jostles with the mighty Malva Pudding for the title of South Africa’s favourite traditional dessert and whilst Malva Pudding may have a greater claim to that crown, Peppermint Crisp Tart must come a very close second. The key to Peppermint Crisp Tart’s enduring appeal is its convenience. All you need to make it are: 4 ingredients, a bowl, a whisk, a dish and a fridge – you can’t get easier than that!

Now I won’t lie to you, South African’s love their desserts jaw-achingly sweet and Peppermint Crisp Tart is no different – this stuff is not for the faint of heart! I’m not the biggest fan of desserts, but even I can’t resist indulging in a small portion of this decadent dessert. Why? Because, to put it mildly, Peppermint Crisp Tart is AMAZING! Something rather magical happens to the ingredients as the tart sets in the fridge, creating a masterpiece of dessert decadence that needs to be tasted to be believed.

Is it refined? No.

Is it subtle? Most definitely not.

Is it the greatest 4 ingredient, non-cook dessert ever conceived? Quite frickin’ possibly.

Click here for the recipe

Traditional English Scones

Who doesn’t love a good scone?

The quintessential English tea-time nibble, scones always go down well and are the prefect example of how a few basic pantry staples can unite to form a delectable baked treat!

Essentially made with just flour, butter, milk and raising agents, scones are the very definition of effortless baking, but like so much in life, such simplicity belies grave pitfalls. Firstly, do not over work the dough – you want your scones to be as light and fluffy as possible, so a gentle touch is best. Secondly (and perhaps most importantly), scones should always be served fresh, preferably straight out of the oven. If you must reheat your scones, then you should only ever do so in a pre-heated oven and NEVER the microwave. If you are ever tempted to use your microwave to reheat your scones, don’t – they will rebel by abandoning their light texture and will become rubbery. Yuck.

I have a dear friend who adores her scones and always orders them when we go out for tea, but not before she interrogates the waitron about their scone-etiquette. The interrogation usually goes along the lines of, “Are your scones good? Are they fresh? When exactly were they made? How do you re-heat them?”. If there is no mention of a microwave then the poor waitron has survived the interrogation and their scones have been deemed worthy. It may seem pedantic to ask so many questions about a simple scone, but many a good scone has been ruined by shoddy and hasty reheating, so it never hurts to ask, lest you be disappointed.

One of the other reasons I love scones is the minimal effort they take to make. Baking does not come naturally to me, so I don’t really like recipes that are too involved or complicated, which makes whipping up a batch of scones an absolute delight and perfect for my limited skill-set. The mixing and kneading takes virtually no time at all and the scones are, more often than not, ready for baking before the oven has had time to heat up. Now that’s my kind of baking!

When it comes to what you should serve with your scones, I’m afraid I am an unabashed traditionalist. For me scones should only ever be served with good strawberry jam, butter and clotted cream, but the latter is quite hard to source outside the UK so I normally settle for just the jam and butter.

To discover other delicious Sweet Treats  from The Muddled Pantry, please click here

Click here for the recipe

Dulce de Leche Creme Caramel

Dulce de Leche Creme CaramelThe epitome of 80s vogue, everybody over a certain age will remember when Creme Caramel was très chic and the dessert of choice at only the most discerning dinner parties. Sadly, along with the likes of Baked Alaska, Creme Caramel has gone the way of the Prawn Cocktail – largely relegated to dubious theme nights and the occasional bout of culinary nostalgia.

Thankfully though, Creme Caramel’s resurrection is at hand. These days there’s a fine line between passé and retro-revival and by simply adding a de rigueur ingredient like dulce de leche, suddenly Creme Caramel has renewed appeal and relevance. From tired to trending with one simple twist on a worn classic!

For a “classic” dessert, this recipe is surprisingly cheap to make. Other than the dulce de leche, most of the ingredients are pantry staples: milk, eggs and sugar. All in all, it’s a pretty impressive dessert for not a lot of money! A veritable institution in South America, dulce de leche isn’t always readily available in South Africa, but you can substitute it with something like Nestlé’s Caramel Treat instead.

Creme Caramel also has an undeserved reputation for being difficult to make, but this couldn’t be further from the truth! Okay, admittedly the recipe looks complicated, but other than the “tempering” the recipe is actually very straight forward. As much as I would love to completely dispel the myth of how tricky it is to make Creme Caramel, I don’t think it’s something we should be shouting from the rooftops. A good dose of culinary kudos is never a bad thing and there’s nothing better than hearing your guests exclaim, “Wait, you actually made this? It’s amazing!”.

Yes, did…and yes it is! Kudos indeed.

For more Sweet Treats from the Muddled Pantry, click here

Dulce de Leche Creme Caramel: Serves 4

  • 2/3 cup sugar
  • 1/4 cup water
  • 1.25 cups milk
  • 1/2 cup dulce de leche (or Nestlé Caramel Treat)
  • 1/4 tsp salt
  • 2 large eggs
  • 2 large egg yolks
  • 1 tsp vanilla extract (or essence)

Method:

  1. Preheat oven to 160C.
  2. In a small saucepan combine sugar and water
  3. Bring sugar to a boil and cook over medium heat until sugar turns a golden caramel color – this should take about 7-10 minutes
  4. Divide the caramel into four 180ml ramekins, coating the bottom of each ramekin – set ramekins aside
  5. In a saucepan, combine milk, dulce de leche and salt.
  6. Cook over medium heat, whisking until the mixture is smooth and just comes to a simmer
  7. Whisk the eggs, egg yolks and vanilla in a medium bowl
  8. When the milk reaches a simmer, take it off the heat and temper the eggs by very slowly pouring the milk into the eggs, all the while whisking furiously. If you are nervous about tempering, rather whisk in the milk, a few tablespoons at a time to ensure that the mixture doesn’t curdle
  9. Strain mixture into a large measuring cup or bowl with a pouring spout
  10. Put a kettle onto boil
  11. Arrange prepared ramekins in a 9×13-inch baking dish
  12. Divide custard mixture evenly into the ramekins
  13. Place baking dish into oven and carefully pour in the freshly boiled water until the water reaches about halfway up the sides of the ramekins
  14. Bake for 25-30 minutes, until just set
  15. Remove the ramekins from the water and allow to cool to room temperature
  16. Cover with cling wrap and refrigerate for at least 4 hours, or overnight

To Serve:

  1. Run a sharp knife around the edge of each ramekin
  2. Place the ramekins in the same baking tray from the day before, add some hot water and allow to stand for a minute
  3. Place a serving plate over the ramekin and invert so that the creme caramel will slide out

Pumpkin Fritters (Pampoenkoekies)

Pumpkin Fritters (Pampoenkoekies)I know they may sound a little weird to the uninitiated, but pumpkin fritters are absolutely delicious!

Enjoyed either as a light snack or side dish to a traditional boerekos spread, these little South African delights are very easy to make, are surprisingly healthy and always go down a treat.

Naturally sweet, they are a great way to dupe vegetable-phobic youngsters into eating one of their “5-a-day”. When lightly sprinkled with cinnamon sugar however, they make a great sweet treat that are impossible to resist!

For more Sweet Treats from The Muddled Pantry, please click here

If you would like to read more about South African food please follow this link or for more South African recipes, please click here

Click here for the recipe

Chocolate Parfait with Pecan Crumbs

Chocolate Parfait I have had more than my fair share of doomed desserts. In fact given the choice, I would happily forgo them completely, or buy-in something instead. I am, however, not a dessert person: never have been, never will be. I would rather have a starter for a “pudding” than a crème brûlée, but I’m in the minority; understandably most dinner guests expect a sweet treat to end their meal, not another bowl of French onion soup! Like any good host I like to give my guests what they want, so I’ve taught myself a few special desserts to cater to their not-unreasonable dining expectations.

Which brings me to this particular recipe – chocolate parfait. In my relatively limited arsenal of dessert recipes, this is possibly my favourite. Part ice-cream, part semifreddo; chocolate parfait is entirely appealing but without the hassle of either. Unlike ice-cream, parfait requires no churning or special equipment. Elegant enough to impress, virtually impossible to stuff-up and always deliciously moreish; chocolate parfait is a dessert coup!

Paired with pecan crumbs, whipped cream and a coulis, this dessert is so delicious even I am tempted to scoff a slice!

For more Sweet Treats from The Muddled Pantry, please click here

Click here for the recipe

Gerry’s Homemade Rusks

Gerry's Homemade RusksWhen I first arrived in South Africa I was completely unprepared for the local obsession with rusks. To my mind, and to most non-South Africans, a rusk is a dry, hard baby biscuit, designed to aid teething – not very appealing. Confused as to why everyone was eating baby biscuits, I soon discovered that rusks here are something altogether different. They are still slightly dry and hard, but they are all about comfort-snacking and dunking. Rusks are South Africa’s biscotti and to my mind nobody makes them better than my dear friend Gerry.

Always made with love, Gerry’s recipe strikes the right balance between comfort and decadence: this recipe is rusk perfection. Although traditionally served with hot coffee, these rusk are so good I can happily forgo the dunking altogether and eat them straight out of the tin!

As for South Africa’s obsession with rusks? Thanks to Gerry’s I get it now, I totally do.

For more Sweet Treats from The Muddled Pantry, please click here

If you would like to read more about South African food please follow this link or for more South African recipes, please click here

Click here for the recipe