Main Meal

Kari Nenas (Malaysian Pineapple Curry)

Kari Nenas (Malaysian Pineapple Curry)

From the heady spiced tagines of Morocco, to the British classic of roast pork with apples, almost nothing divides diners as much as the testy subject of fruit in cooked dishes.

Though their inclusion is widespread throughout some of the world’s greatest cuisines, there are many among us that nevertheless rile against it. To those, the combination of fruit and savoury is tantamount to flavour blasphemy! Now I’m not here to convert you (what’s the point, you’ve probably searched “Pineapple Curry” on the internet, so you are likely already a fan!), but when paired correctly, fruit can be a masterstroke ingredient in many a dish. Whilst I have a couple of fruity dishes that qualify as firm family favourites, one dish in particular holds a very special place in my heart: Kari Nenas.

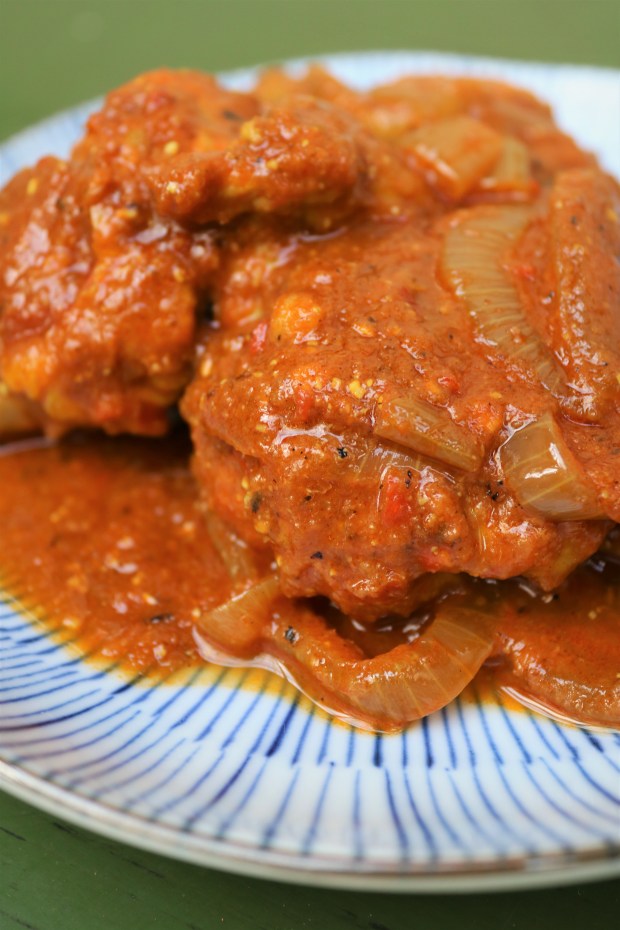
The first time I had this wonderful dish was when I was a child at my youngest uncle’s first wedding. Set deep within the verdant Malaysian jungle, the wedding took place in an achingly idyllic kampong (village). And though I am a little vague on the nuptial itself, the one thing I certainly do remember was the feast that followed. Laid out along the worn wooden floors of the traditional stilted house, was a resplendent collection of Malay dishes, all lovingly prepared by the ladies of the house. All the great classics were there – beef rendang, kari kapitan and, of course, lots of roti jala to mop it all up! I recall taking my place on the floor, ready to tuck in, when I noticed the dish right in front of me was altogether unfamiliar. Yes, it was the Kari Nenas. A fussy eater at the time, I was more than a little hesitate to try it, but after some prompting from those around me, I acquiesced and tried it. I was immediately hooked! Enriched with creamy coconut milk, the dish was an irresistible mix of sweet and sour. Delicious in of itself, the dish also brought harmony to the multitude of flavours on offer. In fact, this was quite possibly the first time I became aware of balance as a concept in relation to flavour: quite a moment in a food blogger’s life!

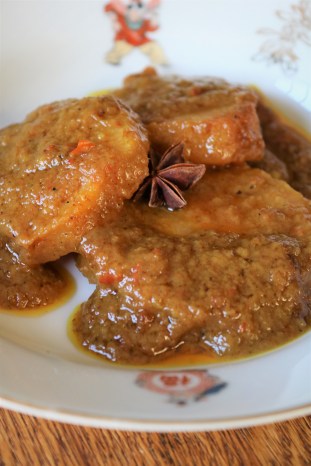
Unlike many dishes with fruit in them, Kari Nenas is all about the pineapple. Typically fruit is added to compliment meat and/or sweeten a sauce, but in this case the fruit flies solo. The secret of its success lies in the combination of coconut milk and tamarind, both of which cut through the sweetness of the fruit. A slight hint of chili rounds off the dish perfectly.

Quick and easy to make, kari nenas isn’t really a curry to be eaten on its own, but rather as part of a larger spread. As I mentioned previously, it goes especially well with beef rendang, lots of sambal belacan and perhaps even with a simple green bean omelette and some rice.

To discover other delicious Malaysian recipes from The Muddled Pantry, please click here

Click here for the recipe

Advertisement

Ayam Masak Merah (Malaysian Red Cooked Chicken)

As a child I wasn’t a great fan of spicy food, in fact I loathed it. Having grown up in Malaysia this presented a very real challenge, especially for my grandmother. The undisputed Queen of the Kitchen, my amah was always keen to entice me over to the spicy-side and did so through a protracted period of gentle assimilation, incrementally introducing my tender palette to the delights of one of my family’s greatest obsessions: chili.

One of my earliest memories of eating around the family dining table was watching as the Ghani men ate raw chili padi dipped in hecko sauce (it was always the men, the woman seemed to have more sense). Egged on by brotherly bravado, my father and uncles would pop these searing missiles into their mouths, chewing and grunting in apparent pleasure, all the while wiping their brows with handkerchiefs damp with sweat. This would go on until the large plate of chillies was laid bare and their stomachs churning in revolt. Apparently, this is what my amah was coaching me for, an adulthood of chili padi and agonising trips to the loo! It was a terrifying prospect to one so young, but thankfully she started me off easy and that is how Ayam Masak Merah become a childhood favourite of mine!

Despite it’s rather alarming name, Masak Merah (red cooked) is actually one of the milder dishes amongst the pantheon of Malaysian curries and was the perfect vehicle to get me started on, what to be, my love affair with all things spicy. Unlike most other Malaysian curries where the use of coconut milk is ubiquitous, Masak Merah is tomato-based, hence the name. Reliant on tomato rather than chili for its colour, the dish is fiery red but without the burn associated with its devilish hue. As it is still ostensibly a curry the use of chili is a prerequisite, but the quantities of such can be reduced without losing the appeal of the dish, making it an excellent option for those adverse to too much heat, especially children.

Quick to make and utterly delicious (even when eaten on the day it’s cooked), my fondness of Masak Merah followed me long after I have graduated to spicer dishes. When I moved to the UK it was one of my favourite tastes-of-home, and whenever I came back from a holiday in Malaysia my bag was always loaded with packets of Brahim’s Masak Merah sauce! Like most expat Malaysians I never bothered to learn how to make our favourite dishes, especially when the quality of readymade sauces were so widely available. Sadly, upon moving to Cape Town, my trips back to Malaysia diminished and with it my supply of those handy packs of Brahim’s. As is the case, there was only one thing for it: I would have to learn to cook Masak Merah myself!

Finding a decent recipe for this beloved childhood dish was surprisingly hard and almost all of my previous attempts fell woefully short of expectations. Cans of tomato soup seemed to dominate the recipes, but as far as I could recall I’d never seen a tin of Heinz in amah’s cupboard, much less in her Masak Merah! Disappointed, I did what every sensible Malaysian does and turned to the family WhatsApp group. Of course, they didn’t disappoint, and the recommendations came flooding in almost immediately. Initially most of these seemed similar to the recipes I’d already tried, but then came the motherload, a message for my aunt, Rohani Jelani. One of Malaysia’s preeminent food writers and cooks, hers was the Masak Merah I had been hoping for and it didn’t disappoint! Simple, both in method and ingredients, this was Malaysian home cooking at its best, and with just a few tweaks was the closest I’ve come to finding a recipe that matches my recollection and expectations. Amah would be proud.

Note: Though not traditional, you could also use jointed chicken wings. Simply dust the wings in seasoned flour, dip in egg and then coat in flour. Deep-fry before adding to the sauce. Reduce to its nice and sticky. Delicious!

To discover other delicious Malaysian recipes from The Muddled Pantry, please click here

Click here for the recipe

Southern-style Pulled Pork

It may seem like a classic overshare, but I recently had a brief (but torrid) romance with a slow cooker that I bought online. Alas it really didn’t end well, but in the three and a half days we were together we did manage to make one great thing – pulled pork.

Ah, pulled pork, how we all love thee.

Arguably the reigning darling of the slow cooking movement, pulled pork is America’s Deep South’s gift to the culinary world. Traditionally slow-cooked and smoked for hours on a barbeque, pulled pork can in fact be cooked in a number of ways including in a slow cooker or even in a conventional oven. I’ve only ever made pulled pork in a slow cooker and its always turned out great, but no matter which method you favour the key word is always SLOW – there is simply no rushing pulled pork.

Although most commonly made with a shoulder of pork, recipes for pulled pork vary wildly from region to region and state to state. Many recipes use a dry rub before cooking, whilst some just use a ‘wet’ recipe where a BBQ sauce is simply slavered over the meat before it’s cooked. Personally I prefer the dry rub method as it most definitely adds more flavour and complexity to the final dish. I also like to leave the skin on the pork as it just offers that extra assurance that the meat won’t dry out – simply peel it off and throw away once the pork is done.

When it comes to the actual “pulling” of the pork many recipes suggest using a couple of forks, but I like to get in there and use my hands. It may be a whole lot messier, but doing it by hand gives you more control over the texture of the pork and it makes it easier to identify any fat or gristle that you may want to remove.

Unsurprisingly, when it comes to serving pulled pork I’m a bit of a traditionalist – it can be served with any type of white bread (any burger bun, bap, pita or pretzel will do), but it should always come with a generous heap of coleslaw on the side (I’m obsessed with Asian Coleslaw at the moment) as well as some extra BBQ sauce.

Note: pulled pork freezes brilliantly

Click here for the recipe

Picanha Steak with Chimichurri

With perhaps the exception of empanadas, nothing screams South America more than picanha steak with chimichurri.

A relatively unknown cut of meat outside South Amercia, picanha is also known as rump-cap or top sirloin-cover. Picanha is characterised by its thick layer of fat and heavy marbling, which gives the meat incredible flavour and succulence, making it one of the most prized cuts of beef to those in the know. Until recently picanha was a cut rarely found outside the Americas, but thankfully that seems to have changed and it is increasingly easy to source locally. Steak-lovers of the world rejoice: picanha is finally here and hopefully it’s here to stay!

So let me not undersell this, picanha and  chimichurri are truly a match made in steak-heaven! The succulent steak and piquant sauce are perfect bedfellows, with the robust and zesty chimichurri cutting through the richness of the steak. Put quite simply, the combination of picanha and chimichurri is pure carnivoristic perfection.

Steak has never tasted this good!

Click here for the recipe

Phat Kaphrao (Thai Beef Mince with Basil & Chilli)

Quick and tasty, phat kaphrao (Thai Beef Mince with Basil & Chilli) is a great dish for anyone who wants some authentic Thai flavour in a hurry! Unlike many other classic Thai dishes, phat kaphrao takes mere minutes to whip up and doesn’t require more than a couple of Thai ingredients, making it a great lunch option or a simple addition to a larger meal.

The real stars of the show are the basil and chilli so it doesn’t really matter what your protein of choice is when making phat kaphrao. Whilst this particular version of the dish uses beef, you can also make it using minced pork or chicken – it really just comes down to your preference and what you have lurking in the fridge at the time. Personally I prefer making it with beef as I find chicken and pork mince can be a little dry – something that the beef’s fat content seems to negate, so don’t use extra-lean mince when making this dish. If you are going to use minced chicken just make sure that it’s made with some dark meat and not just chicken breast.

But back to the all important basil and chilli.

Firstly don’t be shy when adding the basil – use lots…and then add a bit more! I’m of the opinion you can never have enough basil in phat kaphrao! Another thing to bear in mind is that not all basil is created equal and it is important that you use the right kind in the right dishes. Whilst similar to Thai basil, sweet Mediterranean basil isn’t really a good substitute in Thai dishes as it’s far too ‘soft’ to withstand intense cooking and surrenders its flavour all too readily. Admittedly Thai basil isn’t always easy to source so I suggest growing a plant in your garden – it is easy to grow and you’ll have an abundant supply on hand whenever you need it.

Whilst it’s an integral part of the dish’s flavour, the amount of chilli you chose to add to your phat kaphrao comes down to personal preference and tolerance levels. Like most Thais I love my chillies, but I prefer to err on the side of caution when adding them to the dish as the heat of chillies can be notoriously unpredictable. Instead I prefer to serve the bulk of the chillies on the side (chopped and steeped in white rice vinegar) which allows you to add as much heat as you are in the mood for.

For more delicious Thai recipes please click here, or if you need tips on stocking your Thai Pantry please click here.

Click here for the recipe

Pumpkin Ravioli with Shaved Fennel & Burnt Sage Butter

Pumpkin Ravioli with Shaved Fennel & Burnt Sage Butter

For somebody who loves feeding others, I seem to have a propensity for surrounding myself with people with serious food issues.

The omnipresence of my famously flavourphobic partner aside, my small circle of family and friends seem to be a motley crew made up of those with various intolerances, medically restricted diets, committed (and occasional) vegetarians, coriander-loathers, banana-haters and even someone who can’t eat anything green. Whilst I love feeding each and every one of them, they do, however, present somewhat of a challenge to cook for. Luckily (for them?), I do love a good challenge and catering for their specific needs and preferences does force me to try out new things. More often than not, the end results become firm personal favourites.

Which brings me to this particular recipe: Pumpkin Ravioli with Shaved Fennel and Burnt Sage Butter – a dish so insanely good, just saying the name makes my mouth water! Born out of the need to feed a friend who is a borderline vegetarian (and a selfish desire to use a ravioli mould that I bought when last in Rome), this delightful little dish is damn near pasta-perfection on a plate.

A variation of the Italian classic Ravioli di Zucca, the addition of the thinly shaved fennel is a refreshing twist, both in terms of texture and flavour. The crisp fennel and lemon cuts through the richness of the pumpkin/pasta parcels and burnt butter, giving the original dish much needed balance.

This satisfying dish makes for an amazing starter, as it does a worthy main.

For more Italian recipes from The Muddled Pantry, please click here

Click here for the recipe

Lasagne

It may not be considered the most exciting meal these days, but lasagne will forever be a dish close to my heart.

Believe it or not I was a painfully fussy eater when I was a child and lasagne was one of the few dishes I really enjoyed. Fuelled by an unhealthy affinity with Garfield the Cat, my youthful appetite for lasagne was as insatiable as  that of the grumpy ginger feline himself! Whenever my mother asked what I wanted to have for a special occasion the answer was always the same: lasagne, lasagne, lasagne!

In a world obsessed with carb-cutting, the humble lasagne has become somewhat of a relic of family style cooking – a dish that your good old mum would make because she doesn’t know any better or hasn’t bought a new cookbook since 1985. A crying shame really, as this oven-baked Italian classic is a victim of its own popularity. Much like the equally misunderstood and shamelessly corrupted Spaghetti Bolognese, lasagne is in fact a dish of noble proportion and should be appreciated as such. Made well and with love, lasagne is truly a paragon of pasta perfection.

Rich and layered, lasagne is to food what a hot water bottle is to a winter’s bed: the ultimate comfort. To build the perfect lasagne each layer must be generous and distinct, a balanced ménage à trois of punchy ragu (meat sauce), cheesy béchamel sauce and silky pasta.

Lasagne also needs time to rest before serving. Allowing it to cool down will afford each layer the opportunity to solidify its presence in the overall dish and not be overwhelmed by the molten maelstrom of flavour that is a lasagne immediately after it’s taken out of the oven. At least half an hour is needed for everything to cool down although a couple of hours would be better, but overnight in the fridge would be ideal.

Lasagne reheats wonderfully in the microwave in just a few minutes or in an oven (covered in foil) at 180°C for about 15 minutes.

For more Italian recipes from The Muddled Pantry, please click here

Click here for the recipe

Sate Ayam (Chicken Satay)

A perennial childhood favourite of mine, sate is a true South East Asian classic.

Perhaps the ultimate skewered meat treat, sate is often considered more of a snack than an actual meal in itself and is typically ordered as a side dish or “starter”. Sate is also a popular option for young children as the meat is sweet and irresistibly flavoured, without being too spicy – great for fussy eaters!

Whilst beef and chicken are by far the most popular varieties of sate, the use of mutton and goat meat is not entirely uncommon. Personally, I’ve always preferred chicken sate over beef, as it seems to fare better over the hot coals and the inherent blandness of chicken seems to marry better with the flavours of the marinade. Also at least you know what you are getting with chicken (for the most part anyway). The daging (i.e. meat) version of sate is, by definition, a tad ambiguous and there have just been too many scandals where meat of a dubious nature has been passed off as beef.  Trust me, stick to the chicken lest you are partial to the odd bit of horse meat.

At any rate, it turns out that making a decent stick of chicken sate at home is actually pretty damn hard! It isn’t that the recipe itself is particularly complicated or that the main ingredients are impossible to source, the problem lies in recreating the way the sate is actually cooked. Expertly grilled over searing hot coals on a specially designed oblong barbecue and basted with a brush made of lemongrass, the real deal is nothing short of chargrilled-perfection!

After many attempts at recreating the optimal cooking environment for sate, I must confess that I still haven’t got it quite right. Alas sometimes you just need to say “c‘est la vie” and except that perfection isn’t always an option when recreating your favourite dishes. Luckily, however, sate doesn’t have to be perfect to still be pretty damn amazing and totally worth making!

So here are a few tips on making the near-perfect sate:

Firstly, soak your bamboo sticks overnight otherwise they will burn and break off. Make sure the sticks are completely submerged in the water, I use a tall bottle with a stopper to soak mine in.

Secondly, marinate your meat overnight in the fridge – your sate will be all the better for your patience.

Finally, make a basting brush out of the outer skins of the lemongrass; it may seem a tad over-involved to go to such extremes, but it’s worth it.  To make the brush, simply shred the reserved lemongrass lengthwise and then tie at the top with some kitchen string. Give the “brush” a very light bash with a meat mallet just before using.

To discover other delicious Malaysian recipes from The Muddled Pantry, please click here

Sate Ayam (Chicken Satay) Click here for the recipe

Aloo Mutter (Peas & Potato Curry)

I’m not sure many people can say this, but I owe my sanity to aloo mutter…or at least my sanity in India anyway.

Travel has always been a huge part of our lives. From Tokyo to Kathmandu, down to Ushuaia and all the way back up to Kirkenes, we are blessed to have trampled the globe together. For me our travels have always been synonymous with seeking out new food experiences. For my flavourphobic partner, however, the mere notion of culinary-tourism is unpalatable. In spite of being the most well travelled person I’ve ever met, my partner holds scant regard for sampling foreign flavours in foreign climes. This is, after all, a man who ate nowt but Big Macs in Beijing, Whoopers in Bergen, doner kebabs in Florence…and then there was India.

Ah, dear Mother India!

A land defined by fierce fragrances, earthy hygiene and spicy flavours; India is a culinary destination that should strike fear in the hearts of even the bravest of world travelers, let alone those of limited culinary bravado i.e. ‘you know who’…or so you would think. Little did I know that, culinarily speaking, the sub-continent would prove to be one place in the world the Flavourphobe would have no problem finding something to eat – all thanks to aloo mutter! Who knew a man could almost exclusively live on peas and potatoes for a month, but that he did. With the exception of the occasional aloo gobi, he had it in the South, he had it in the North, he even had it somewhere in the middle and he loved it every single time…but not as much as I did! No one was happier than I when we saw aloo mutter on the evening’s menu; not because I wanted to eat it myself, but rather because it meant we could actually enjoy a meal together whilst on holiday! For the first time on our travels I had been spared our usual dinner-time routine of depositing him at the nearest KFC whilst I sampled the local delights on my lonesome. At last, we could eat at the same restaurant every day. What travel bliss! Indeed what a privilege!

So did aloo mutter prove to be that watershed moment when he would finally open his taste buds to the favours of the world? Hah, don’t make me laugh. With the exception of Japanese Curry, his culinary ‘awakening’ was as short-lived as our time in India. Soon enough we were back to traveling together, but eating apart. Alas, the dream couldn’t last forever and the aloo mutter bubble had to burst at some stage. We will, however, always have dear Mother India and the days she granted us the simple pleasure of  enjoying a meal, together.

Oh…did I forget to mention that aloo mutter is also incredibly delicious and cheap to make? Don’t just take my partner’s word for it, it really is possibly the best way to jazz up a couple of potatoes and those long-forgotten peas at the back of the freezer! Aloo mutter is definitely a worthy addition to any Indian meal.

For more of my top picks for an Indian feast, please click here, or for more great Indian recipes from The Muddled Pantry, please click here

Click here for the recipe

Thai Caramel Pork (Muu Waan)

Caramel is something that most of us associate almost entirely with Western cuisine, more specifically with Western-style desserts, but the use of caramel is, in fact, common in Asian cooking, especially in those countries that formed part of the colonial Indochina region.

In Vietnam, Cambodia, Laos and, to a lesser degree Thailand, the use of caramel sauce is fairly routine and is considered a pantry staple, added to a wide range of dishes. The caramel sauce enriches the colour of the dish and imparts a sweet, smoky undertone. The Vietnamese, in particular, are especially fond of this ingredient. Known as Nước Màu, some of Vietnam’s most popular dishes rely heavily on its inclusion – Bún Chả and Thịt Kho Tàu being prime examples.

Whilst its use is not as prevalent in Thailand, cooking with caramel is not uncommon in Thai cuisine, although typically the flavour is achieved through the caramelisation of palm sugar and not the use of a ready-made caramel sauce. Sweet meat dishes in Thai cuisine are considered the perfect foil to sharper, acidic flavours, as well as creamy coconut dishes – the classic pairing of Shredded Candied Pork, Coconut Rice & Green Papaya Salad (Som Tam) being a case in point. This heavenly balance of flavours is not, however, solely restricted to this classic combination and is something that should be considered when planning any Thai meal. This is where Thai Caramel Pork (Muu Waan) comes into its own.

Similar in flavour to Shredded Candied Pork, Thai Caramel Pork is in fact far quicker to make and is less labour intensive and can be used as an alternative to the shredded variety in the classic combination mentioned previously. Personally I like to pair Caramel Pork with a coconut-based dish such as a Mussaman or a Green curry and a zingy yam (Thai Salad). I am especially fond of serving it with either a simple Fried Egg Salad (Yam Khai Dao) or Waterfall Beef Salad (Neua Naam Tok).

Regardless of what you decide to serve it with, provided you cover the trifecta of Thai flavours (sweet, sour and rich), you’ll be onto an absolute dinner-winner!

For more delicious Thai recipes from the Muddled Pantry please click here

If you would like tips on stocking your Thai Pantry please click here.

Click here for the recipe