Main Meal

Gosht Shahajani (Rich Lamb Curry with “Roast” Potatoes)

Gosht Shahajani (Rich Lamb Curry with "Roast" Potatoes)I’m always looking for new curries to make and this one fits the bill perfectly! Rich and tasty, this unusual lamb curry makes a nice change from my tried and tested favourites of rogan josh and chicken kadhai.

Whilst gosht shahajani is in many ways similar to gosht aloo, I love the idea of adding the precooked “roast” potatoes to the dish, instead of boiling them in the curry’s sauce. Of course, the potatoes inevitably lose their crunch when added to the sauce, but they do add a texture and flavour to the dish that sets gosht shahajani apart from similar curries.

My version of this dish has evolved quite significantly from the original recipe, as I found the quantities a tad excessive – 150ml of tomato purée and 10 tablespoons of chopped fresh coriander for 800g of lamb? I adore flavour, but even my palette has its limits! I also prefer to fry my potatoes and onions in ghee rather than oil, as this gives them a fuller flavour and consequently, a greater presence in the dish. If you don’t have any ghee or prefer not to use it, you can just substitute it with vegetable oil.

For more of my top picks for an Indian feast, please click here, or for more great Indian recipes from The Muddled Pantry, please click here

Click here for the recipe

Cape Malay Mince Curry

A quick and easy to make, Cape Malay Mince Curry is one of the most commonly eaten curries in South Africa.

Typically eaten with rice, mince curry is also often used as a filling in rotis and vetkoeks or eaten on toast with eggs for breakfast; making this curry as versatile as it is tasty! Mince curry is also a popular choice when feeding large groups of people as it is relatively cheap to make and a little goes a long way. The addition of peas and boiled eggs is common, although far from essential. Personally, I prefer to make mine with peas as it makes for a more nutritionally-rounded meal.

As humble as it may be, mince curry deserves to be called a Cape classic!

Click here for the recipe

Pork, Chickpea & Black Pudding Stew

As I’ve mentioned in previous posts, I have a real soft spot for a good old slice of black pudding!

A grim stalwart of a true Full English, black pudding has for many years been perceived as being one of the more unpalatable progeny of British cuisine. Along with the likes of jellied eels and winkles, black pudding harks back to an era when Britain was not unfairly considered the culinary backwater of Europe. Mercifully though, the tide has long since turned and thanks to an army of parading TV chefs, there is a renewed appreciation of local produce and food traditions in the UK. As a result, British cuisine has witnessed an unprecedented renaissance and thankfully, winkles not withstanding, the likes of black pudding have come along for the ride. Unfortunately, the reality is that few ingredients can transcend disgusting to de rigueur, but black pudding is slowly making its way back into the mainstream of British cuisine.

In nearby Spain, however, black pudding has had a far easier time of it. Known as morcilla or blood sausage, the Spanish seem to have none of the hang-ups about eating it that typically plauge its British cousin. Whether it be simply fried and served with bread or used to add depth and flavour to stews and soups, morcilla remains popular throughout Spain, if not the entire Spanish-speaking world.

Which brings me to this delightfully hearty stew!

On the face of it, this is just another typical Spanish stew, but what sets this recipe apart is, of course, the addition of black pudding. One of the last ingredients to be added, the black pudding has a transformative effect on the dish and is an absolute flavour-masterstroke – especially if the stew is afforded an evening to mature in the fridge. First fried and then added at the final stage of cooking, the black pudding melds with the sauce as it simmers, adding a depth and richness that elevates this humble stew to new, delicious, heights! 

For more great one-pot wonders from The Muddled Pantry, please click here

Click here for the recipe

Mapo Tofu 麻婆豆腐

With the exception of the most amazing Peking Duck I’ve ever eaten, I was disappointed to discover that Chinese food in China is a rather dull affair. Roasted locust and the occasional snake-on-a-stick not withstanding, bland soups and mediocore dumplings seem to be the order of the day on the streets of Beijing.

After spending the best part of a week eating possibly the dullest Asian food on earth, we chanced upon a massive subterranean food-court that specialized in regional food from all over China. It was here, in this overcrowded and windowless basement, that we finally discovered some of that allusive “Chinese flavour” in China – we had found Sichuanese food or more specifically, mapo tofu! Little did I know that I stumbled upon what would possible become one of my favourite Chinese dishes of all time.

Mapo Tofu 麻婆豆腐

Loosely translating to “grandmother’s pockmarked tofu”, this colorfully named dish has all the hallmarks of a true Sichuanese classic. Spicy, stastifiying and, above all, “numbing”, mapo tofu has got it all! Packed full of flavour, it is a great dish to introduce the uninitiated to the unsung delights of tofu. The soft, silky texture of the tofu plays beautifully against the fiery sauce, resulting in a “cooling” contrast to the intensity of the dish.

Easy to make and always tasty, mapo tofu is the epitome of Chinese home-style cooking and makes for fantastic meal on its own with just some rice. Equally, though, mapo tofu makes a great addition to a larger Chinese banquet as it can be made ahead of time and then gently reheated before serving (something of a rarity in Chinese cooking).

Click here for the recipe

Penang Char Kuey Teow 炒粿條

Universally the Noodle-World is typically divided into two distinct camps: soupy or fried. Every great noodle-eating culture has its own unique fried classics – in Thailand the ubiquitous pad thai reigns supreme, whilst yakisoba proudly flies the flag for Japan, but in both Malaysia and Singapore the undisputed king of fried noodles has to be Char Kuey Teow.

Penang Char Kuey Teow 炒粿條Literally meaning “fried flat rice-noodle”, Char Kuey Teow enjoys enduring popularity through-out both Malaysia and Singapore, manifesting in many delicious guises, accommodating a variety of tastes and dietary restrictions. Sliced fish-cake and bean-curd are popular variations, especially with halal interpretations of the dish, but Char Kuey Teow is at its best when eaten in its most authentic form – Penang-style! Like all hawker-fare in Penang, everyone has their favourite Char Kuey Teow stall, the most popular of these can immediately be identified by the snaking queues that lead to them. In Malaysia one should never be put off by a queue for food – invariably they end in a tasty delight that is always well worth the wait!

Stripped back, Penang Char Kuey Teow is a very simple dish made with just a few well chosen ingredients. With the exception of the noodles, the dish is made up of just 6 vital ingredients: prawns, beansprouts, Chinese chives (garlic chives), egg, Chinese sausage (lap cheong) and blood cockles (see hum), although the latter is often omitted locally due to health concerns (and many a runny tummy!). Lap cheong is an acquired taste and is therefore sometimes left out at the request of the customer. Whilst some of the ingredients may sound intimidatingly exotic, they are easily found at most well-stocked Asian supermarkets, although the blood cockles can be trickier to source. These can be left out altogether or substituted with a less exotic mollusc! I often use tinned clams as a substitute.

Another important component of the dish is the cooking sauce. Even though only a few teaspoons are added to the noodles, the sauce can make or break the dish. Given that Char Kuey Teow is classic hawker-fare, authentic recipes for its soya-based sauce are hard to come by, as the exact quantities and ingredients are often a fiercely guarded secret! I have tried a myriad of recipes over the years, but the nearest I have found to the real thing is from Rasa Malaysia, although I prefer to use slightly less dark soya sauce. Although the below recipe’s quantities are for a single serving, the sauce recipe will yield enough to make at least 10 plates of Char Kuey Teow and can be kept in the fridge until needed.

Ingredients aside, the key to making a decent Char Kuey Teow is technique and a hot, hot wok. A wide, well-seasoned wok needs to be kept searing hot throughout and as a result, only individual portions can be cooked at a time. Given the dish’s ferociously short cooking time (just a few minutes per portion), preparation of all the required components is vital – everything needs to be ready and to-hand when you start cooking. A moment’s hesitation can be the difference between success and ultimate noodle-failure!

Click here for the recipe

Confit de Canard (Duck Confit)

Duck ConfitLet me be clear from the start – French food freaks me out.

Alarmingly sophisticated, I have always been wary of making it at home and, on the face of it at least, with good reason. Widely regarded as the pinnacle of Western cuisine, French food seems to thrive on its reputation that it is impossibly complicated and perceived to be beyond those of us not blessed to be born French, or trained in the art of cordon bleu cooking! The truth is that neither of these “prerequisites” should be an impediment to whipping up your favourite French delight!

Generally speaking, much like many of the world’s other great cuisines, French food is all about making simple food exceptionally well. The devil is in the technique, but thankfully this can be mastered, or at the least, approximated. Armed with the weighty Larousse Gastronomique and some self-confidence, there is no reason why you can’t be tucking into your favourite bistro fare come dinner time.

Which brings me to this recipe. Perhaps the epitome of French cuisine, duck confit is simplicity made complicated, or at least so it seems. To make a confit is, in essence, an act of preservation – in this instance with duck. Whilst the preservation and cooking process is quite lengthy, it isn’t actually particularly complicated, but attention to detail is paramount. Every step of the recipe is essential, and I recommend one reads through the recipe a couple of times to familiarise yourself with the cooking process before starting. Duck Confit is not a recipe that should be rushed, so a certain amount of planning is required when making it. Effectively a dish that takes up to the better part of two days to prepare, don’t think to buy your duck in the morning and expect to be serving it come that evening!

One of the best things about duck confit is its near immortal shelf-life. Stored correctly in the refrigerator, duck confit can be kept for as long as 6 months, making it the ultimate pantry item – perfect for impromptu dinner parties or a special treat!

With all that said, duck confit’s meticulous preparation, prolonged curing time and languid cooking process shouldn’t deter you from making this dish! After you’ve made it once, you’ll realise that it is surprisingly straightforward and is not as complicated as it initially seems. After all, this is French cooking we are dealing with here and it wouldn’t be French if it didn’t at least sound intimidating!

Click here for the recipe

Involtini Di Vitello Alla Siciliana (Sicilian Veal Rolls)

The first time I had these traditional Sicilian rolls was in a small Italian restaurant just off the main drag in Camps Bay. The moment I saw them on the menu I knew I had to have them. Not only did they sound utterly delicious, but just saying the dish’s name out-loud when ordering it made me feel thoroughly Italian!

INVOLTINI DI VITELLO ALLA SICILIANA (SICILIAN VEAL ROLLS)Sadly, in spite of its gloriously evocative name, I was actually less than thrilled with the meal, albeit it has been suggested that I should never eat out given my propensity for disappointment. Nevertheless, in spite of my culinary chagrin, I was convinced that the dish still had merit and that it was worth trying to recreate at home. After some obsessing and research, I eventually attempted my own involtini and I’m pleased to say that they didn’t disappoint!

Whilst there are a myriad of versions of involtini out there, this particular recipe is very much typical of the involtini from the Sicilian capital Palermo. Loaded with ingredients such as toasted pine nuts, raisins, onion, bay leaf and pecorino, these rolls are wonderfully aromatic. Another filling option is to include some pepperoni, as they do in the region around Catania. Given the wide range of regional variations, feel free to play around with the filling – chances are it will still be delicious!

With regards to what to serve with your involtini, I would recommend pairing them with some Swiss chard sautéed with a few mushrooms, some garlic and a splash of white wine or vermouth. Add a few slow-roasted cherry tomatoes and you’ll have a veritable feast!

For more Italian Classics from The Muddled Pantry, please click here

Click here for the recipe

Cape Malay Green Bean Bredie

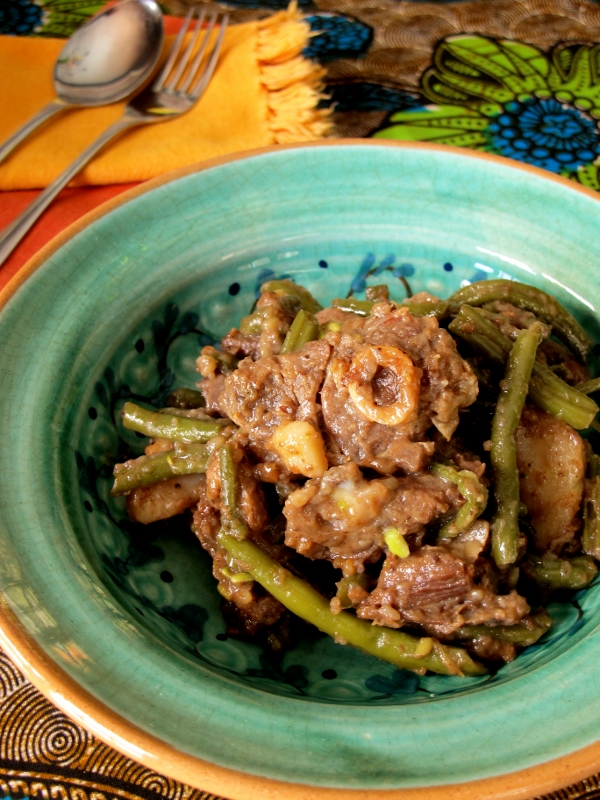
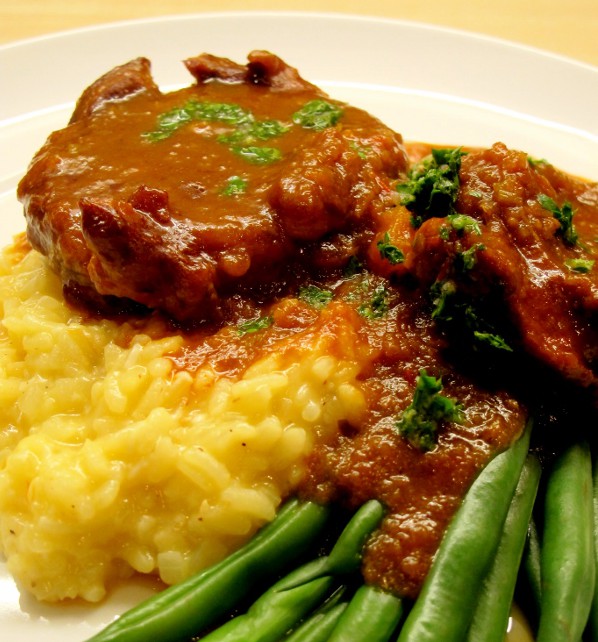
As I have said in previous posts, bredies are an inescapable part of traditional South African cuisine and are, to many, the quintessential definition of South African huiskos (home cooking). And whilst tomato bredie may rule supreme in most kitchens, there are a number of different types of bredies that remain popluar, green bean bredie being chief among these.

Although less stew-like than it’s tomatoey cousin, the green bean version retains the key element that separates a bredie from a regular stew, that being that no liquid is added during the main cooking process. Instead of simmering in a liquid like a conventional stew, a bredie is self-saucing. Other than an initial splash of water when cooking the onions, absolutely no water is added to a bredie and its flavour is purely formed from the rendered juices from the lamb and the steam from the cooking vegetables, resulting in a dish that transcends its humble basic ingredients.

That said, I personally believe that green bean bredies can be a tad dry and can actually benefit from a bit of water after (and only after) the cooking process is complete. Controversial I know, but adding a dash of water when reheating the bredie will not only aid in warming the dish through, it will also ensure that the bredie’s wonderful flavours are given a chance to truly come to the fore.

Green Bean BredieAs with my version of tomato bredie, I have drawn inspiration from Cass Abrahams‘s recipe, albeit with some unorthodox cooking methods of my own. Cass Abrahams is widely regarded as the reigning queen of Cape Malay cooking and her recipes are often the launching point for many of my own.

When I initially attempted to make bredies my efforts were a tad watery and the meat would often come out a little tough. My first few efforts were so bad, they were given an unequivocal thumbs-down by my bredie-loving partner! Devastated, my early failures were enough to put me off making bredies for many years! When I eventually built up enough courage to attempt a bredie again, I decided that I needed to reinvent the cooking process to deal with my bredie-deficiencies.

I started by addressing my “watery” sauce. This was solved by first dredging the meat in seasoned flour before browning it thoroughly, resulting in a “fuller” finish to the sauce. To deal with my tough meat disasters, I decided to cook the bredie in the oven and not on the stove as it is typically done. Whilst I cook my tomato bredie in the oven for the entire cooking time, I only do so for the first half of the recipe when making green bean bredie, as I find the vegetables render superior flavour from being cooked on the stove-top. Either way, bredie traditionalists would be mortified by my preferred cooking method, but I find that cooking it in the oven helps creates an intensity in the gravy that you wouldn’t otherwise get when cooking it in the conventional way. I have been making all my bredies in this way for many years now and they have always been a success, the meat is invariably melt-in-your-mouth tender and the sauce is thick and bursting with flavour.

If you would like to read more about South African food please follow this link or for more South African recipes, please click here

Click here for the recipe

Ossobuco

OssobucoArguably the figlio preferito of Lombardy’s regional cuisine, ossobuco is, perhaps, the ultimate Italian braise. This is not a dish for the fainthearted, this is real stick-to-your-ribs fare! I would categorise ossobuco as lick-your-plate food, something that, even in the politest of company, I cannot help but do!

Sadly though, like many other Italian classics, ossobuco has suffered more than its fair share of well intended culinary-meddling and is, more often than not, worse off for it. Of course, there is never a definitive version of any Italian recipe. Familial traditions and regional variations are the norm throughout Italy and, as a result, there are countless interpretations of how to cook ossobuco. But as with all culinary classics, there are always rules and whilst none are ever truly set in stone, these are the three “ossobuco rules” that I recommend adhering to:

  1. Meat: Ossobuco should only ever be made with veal shanks. Unfortunately this isn’t really negotiable, as it simply would not be ossobuco if it was made with beef shanks, or perish the thought, lamb. Whilst the braise still works well with either beef or lamb shanks, you could not in good conscious call the dish ossobuco if you used either of these.
  2. Bone-marrow: Ossobuco literally translates as bone-hole, so it should come as no surprise that bone-marrow is an inescapable part of the dish. In fact, sucking out the tender veal-marrow is integral to the joy of eating ossobuco. If you are still haunted by Mad Cow disease, then this most definitely isn’t the dish for you!
  3. Accompaniments: In truth, ossobuco can be served with just about anything; whether it be with a crisp potato rosti or with buttery mash, it will be delicious. But just because it tastes good, doesn’t make it right! Traditionally ossobuco is always served with risotto alla Milanese and is typically garnished with a sprinkling of gremolata. Sometimes tradition knows best and this is such a time, the combination of all three elements is simply stellar! Even if you don’t serve it with the risotto, I would urge you not to skip the gremolata – it is very easy to make and elevates the ossobuco to an entirely different level.

For aficionados there are, of course, a myriad of other do’s and don’ts: should tomato be added, red wine or white? To be honest, our pantries and situations do not always allow us the luxury of perfection so, rules or no rules, we have to make do with what we have available.

As much as I absolutely love ossobuco, I usually have mixed emotions whenever I see it on a menu and I never order it lightly. Despite my mind being awash with those pesky “rules”, provided the basic tenets are adhered to, my leap of faith is invariable justified and I still enjoy my dining choice irrespective of my skepticism. Testament, perhaps, to ossobuco’s infinite variability and appeal. I guess you just can’t keep a good dish down!

For more Italian Classics from The Muddled Pantry, please click here

Click here for the recipe

Vietnamese Braised Pork in Coconut Water (Thịt Kho Tàu)

Thịt Kho Tàu (Braised Pork in Coconut Water)This venerable Vietnamese classic is traditionally made to celebrate Tết, the Vietnamese Lunar New Year, but is popular all year round. Packed full of flavour, this sweet and tender braise of pork is simmered in coconut water and is a firm favourite throughout Việt Nam, especially in the South.

The first time I encountered this dish was in a restaurant in Hồ Chí Minh City. My uncle, who was working in Việt Nam at the time, took us out for a lavish Vietnamese dinner and this dish was the undisputed star of the meal. After simmering away for hours in its delicious coconut broth, the pork was achingly tender and sweet, but the real revelation was the generous layer of fat. Soft and rich, yet surprisingly light on the tongue – the fat had been transformed into the true master-stroke of the entire dish. This was pork fat in all its gelatinous glory!

Whilst I’ve always made this dish with pork belly, in truth you can actually use any number of cuts of pork, as long as the meat isn’t too lean. Personally, though, I prefer sticking with pork belly for this dish as it doesn’t dry out from the extended cooking time and the fat imparts a wonderful flavour into the broth.

Traditionally eaten with rice and often accompanied with a simple daikon & carrot pickle (Đồ Chua), I also love to pair this dish with some water spinach stir-fried with garlic.

Click here for the recipe